Unity 在脚本中修改 UGUI 中 UI 的位置和尺寸
🌴 前言
在制作魔剑镇魂曲的对话框系统时, 在对话框的后面要显示当前人物的立绘图片, 这里的立绘图片我用的是 UGUI 里面的 Image 组件, 使用的位置组件就不再是 Transform, 而是继承自它的 RectTransform 组件, 但怎么用呢?
🌾 RectTransform
强烈推荐一篇博客: Unity进阶技巧 - RectTransform详解 看完这篇博客, RectTransform 组件就基本明白了, 这里不再赘述.
🦄 脚本控制 RectTransform
在 Inspector 面板中我们关注的数值:
| 数值名 | 备注 |
|---|---|
| Top | 顶部距离 |
| Bottom | 底部距离 |
| Left | 左侧距离 |
| Right | 右侧距离 |
| PosX | 位置坐标 X |
| PosY | 位置坐标 Y |
| Width | 宽度 |
| Height | 高度 |
在脚本中, RectTransform 下可以获取的属性值, 同时我也列出了这些值和 Inspector 面板中数值的关系.
| 名称 | 类型 | 备注 |
|---|---|---|
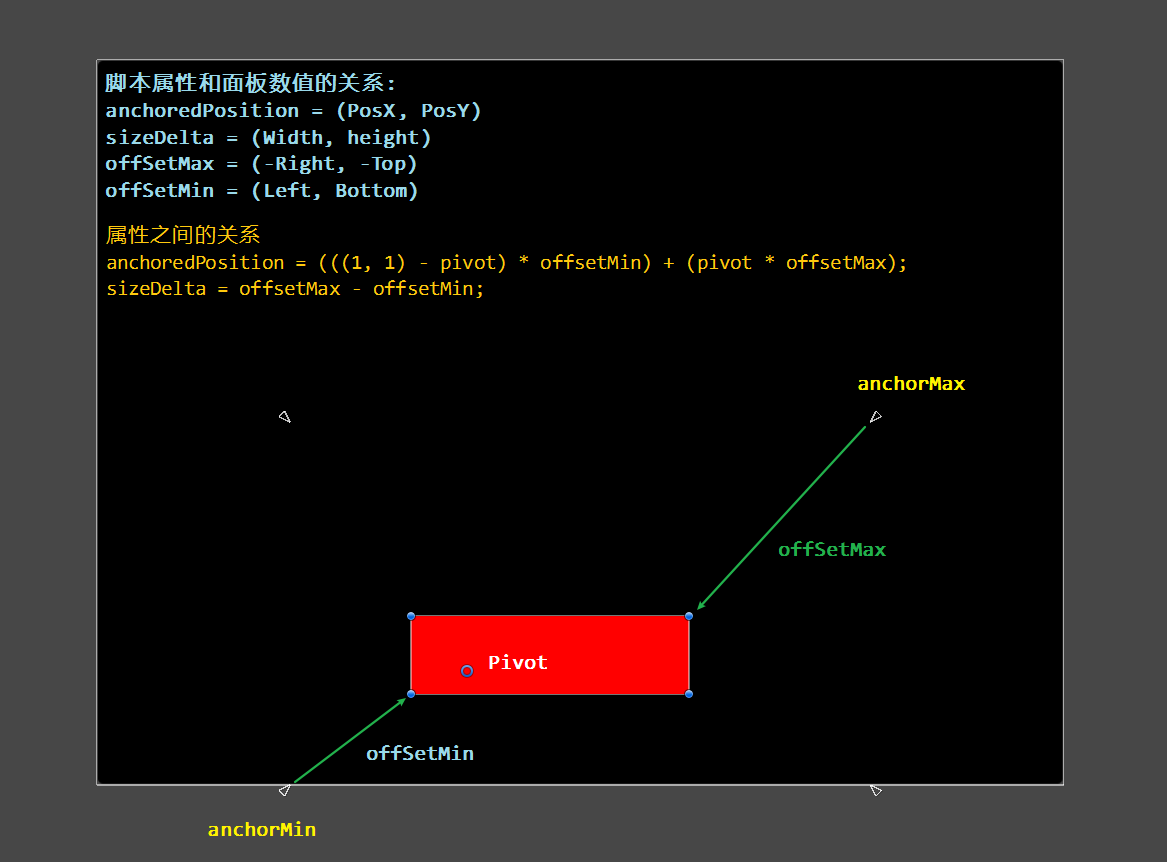
| anchoredPosition | Vector2 : (anchoredPosition.x, anchoredPosition.y) | (PosX, PosY) |
| anchorMin | Vector2 : (anchorMin.x, anchorMin.y) | |
| anchorMax | Vector2 : (anchorMax.x, anchorMax.y) | |
| offsetMin | Vector2 : (offsetMin.x, offsetMin.y) | (Left, Bottom) |
| offsetMax | Vector2 : (offsetMax.x, offsetMax.y) | (-Right, -Top) |
| sizeDelta | Vector2 : (sizeDelta.x, sizeDelta.y) | (Width, Height) |
| pivot | Vector2 : (pivot.x, pivot.y) |
在脚本中如何修改数值. 下面的代码中, 如果需要某个值不变, 直接赋予原值即可.
Right 和 Top
1 | float customTopValue = 1.0f; |
Left 和 Bottom
1 | float customBottomValue = 2.0f; |
PosX 和 PosY
1 | float customPosXValue = 3.0f; |
Width 和 Height
1 | float customWidthValue = 4.0f; |
🐬 属性之间的关系
anchoredPosition 和 pivot, offsetMin, offsetMax
1 | anchoredPosition = ((Vector2.one - pivot) * offsetMin) + (pivot * offsetMax); |
sizeDelta 和 offsetMin, offsetMax
1 | sizeDelta = offsetMax - offsetMin; |
总结图
参考文章
Unity进阶技巧 - RectTransform详解
修改RectTransform的值